Supplies that are needed to build a set of Cornhole boards are:
Image by Cornholeplayers.net
Tools needed to build a set of Cornhole boards are:
Wood and materials can be obtained from any large hardware stores. The larger stores (Home Depot and Lowes) are suggested due to their ability to pre-cut wood to specific customer dimensions.
The plywood which composes the main board can be purchased in the exact size specifications. If not, the retailer can cut the plywood to the size needed.
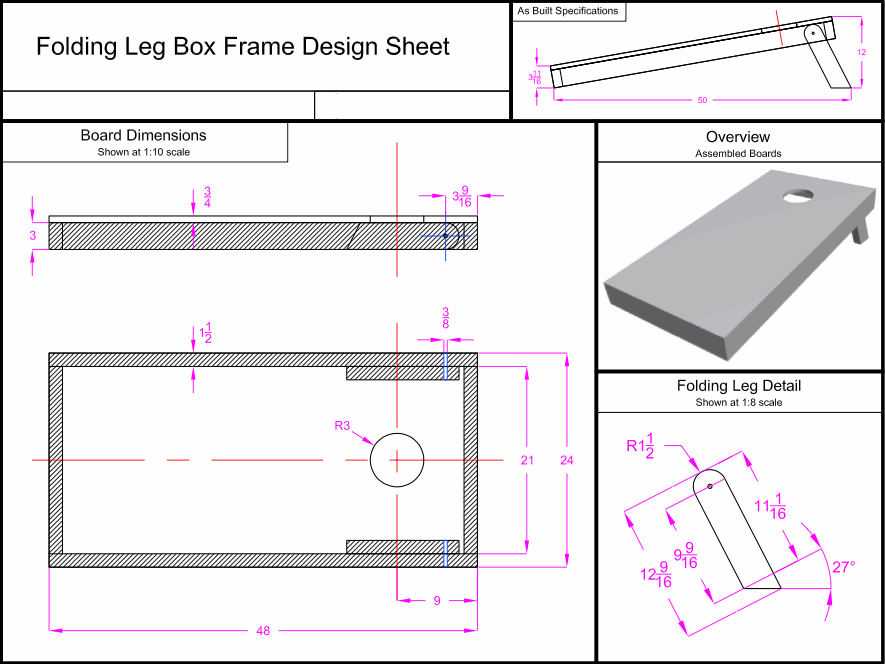
The 2x4 pieces need to be cut to size. This is done by making measurements first with the tape measure and than using a band saw. The 2x4 pieces of wood for the sides of the set are cut to 48 inches or 4 feet and pieces of wood cut for the top and bottom of the set are cut to 21 inches. The tops/bottoms are cut to a shorter dimension than the size of the board because they wedge in between the other 2x4 pieces from the side of the board. There will need to be 4 pieces of sides and 4 pieces of tops/bottoms cut.
Still utilizing the band saw, the legs need to be cut. This aspect of the build can be a little tricky. The length of the legs needs to be a little over 1 foot in length. It is prudent though to cut the leg pieces larger, as further cutting of the legs will need to occur later. The legs should be cut to around 14 inches, with a degree cut (slanted cut) made at one end of the piece to about 27 degrees. This degree cut will be the bottom of the leg. The build for a set requires 4 legs to be cut.
The legs will need to measure 1 foot and 9/16 inches. The jig saw will be used to cut a rounded edge on top of the legs so they can fold underneath the bottom of the board upon assembly. This is done by placing the leg piece in a vice, and rounding the top of the leg piece off.
After the four legs are finished, we can move back to the board construction. The 2x4 pieces that were cut early should be constructed to make a box structure. Place the larger pieces down on the ground and the top and bottom pieces on the top and bottom. Put some wood glue in between the four sides and use two inch wood screws to screw the pieces together.
After the two box like structures are made, place the two plywood pieces on top of the box structures and screw them in. The same screws can be used for this purpose.
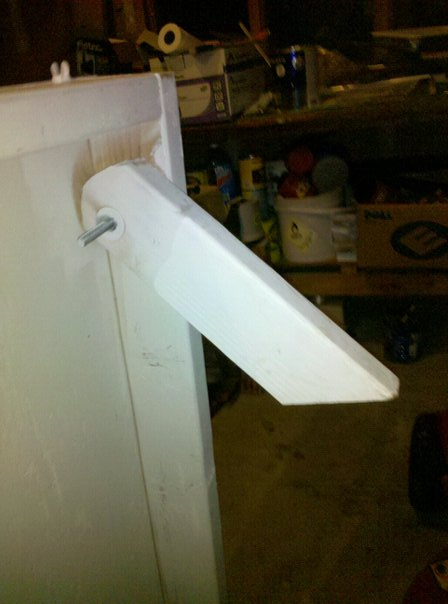
After the boxes are created, the holes can be cut. Measure 12 inches from the top of the box down and draw a straight line. This line will be the bottom of the hole. From this line, draw a line 6 inches up. This will be the top of the hole. Lastly, draw a line 9 inches from each side of the box in between the two lines that were just made. The created box will then be the hole for the board, which will be 6 inches in circumference. You can use a power drill and a jig saw to cut the hole. First use the power drill to drill a hole in the wood. Then use the jigsaw to cut out a round hole into the box that was just drawn.
Below is a picture of what the assembly will look like once the pieces are completed
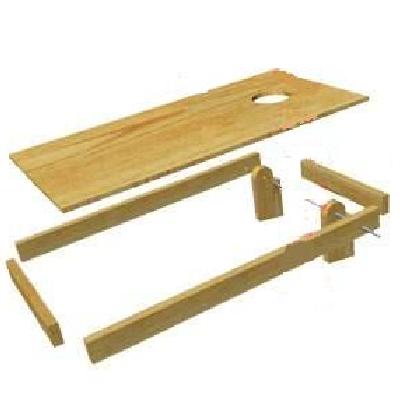
Image by Cornholeplayers.net
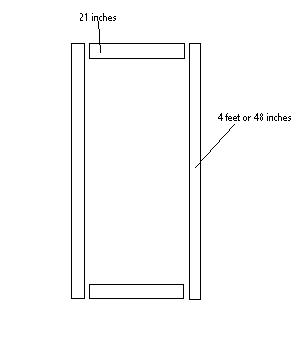
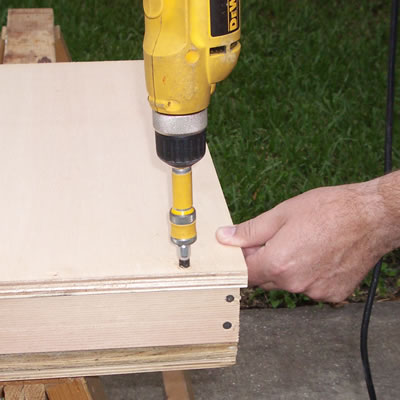
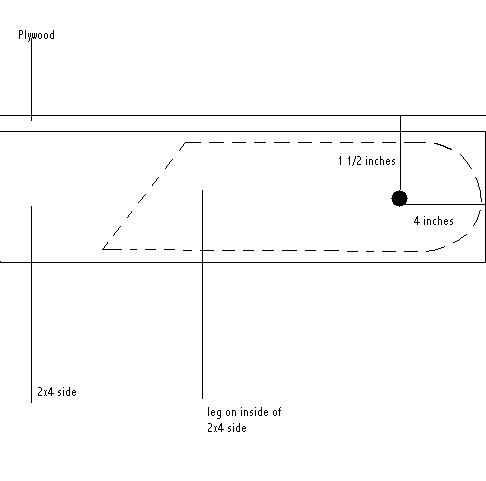
With the boards now completed, the legs can now be attached. Take two of the pre-cut legs pieces and the power drill with the 3/8 inch drill bit. The hole that will be drilled into the sides of the board and through one of the legs will be 4 inches from the rear and an inch and a half from the top of the board. Drill through both the side of the 2x4 piece of wood and the leg pieces on the other side of the wood. Holding them together and going slowly on the drill, or if available a moveable vice can be used, drill a straight hole through the two pieces.
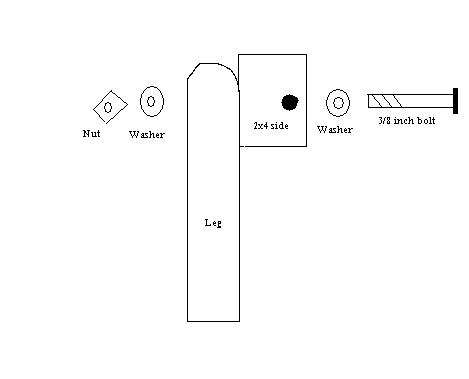
After the holes in the legs have been drilled, the legs can now be attached to the rest of the board assembly. The four inch 3/8 gauge screws and washers will be used now, as well as the 3/8 inch gauge nuts. Place a washer at both the front of the leg and behind the back of the 2x4 side of the board. Place the bolt through the washer, the 2x4 side of the board, the leg, the last washer and then apply the nut to the end of the bolt. Make sure the legs can move freely back and forth and the rounded top part of the leg is easily moving against the bottom of the board itself. If the legs are not moving easily due to the top of the leg grinding against the bottom of the board, simply remove the leg and round off the rounded top edge of the leg with the jig saw.
The construction of the boards is now completed. Check out the "Designs" section to see how to paint and make custom designs on your Cornhole boards.
| Navigation | Home | Rules | Building | Designs | More |
|---|
![]()